
Technology strategy
Maximizing business productivity: Resolute’s ChatGPT enterprise training


Nowadays, it’s becoming more and more of a need to speed up development time by utilizing various cloud services. Businesses strive to ship products faster, without worrying too much about the underlying infrastructure. Undoubtedly, this determines an era, where modern terms as serverless quickly gained strong popularity. It’s interesting to know all the possibilities, which are now available as end-to-end solutions in different areas, especially in Access Control and Identity Management.
Firebase is a Serverless Cloud Backend platform, which presents numerous out-of-the-box solutions and integrations for the development process of a software product. One of the most crucial pieces in every software application is the Identity system. Luckily, Firebase has already taken care of that, and it offers a variety of different mechanisms for Identity Management, such as e-mail and password-based authentication, Federated Identity integration, as well as authentication via using a phone number. Next to that, Firebase also allows building custom authentication systems, which might come handy for the integration of legacy systems. In this tutorial, we’ll go through the implementation of a similar system, which works with one-time-passwords (tokens). In other words, instead of having permanent passwords, users of the system will be using one-time-passwords (tokens) generated by the Google Authenticator application on their mobile phones. Having said that, we’ll be building our solution using the Admin SDK from Firebase.
If you are not familiar enough with some of the topics above, I would highly recommend that you read some materials, so that the content below would be easier to follow and comprehend. The content will be presented as a high-level overview without going into details on how to set up and deploy the micro-service. Topics such as Service-Oriented-Architectures, serverless technologies (in this case Firebase) and NoSQL databases are crucial prerequisites. Last but not least, it’s a good idea to quickly recall what OTP-based authentication is. Moving on, we expect that you are familiar with the main concepts behind it.

Let’s quickly sum up what we observe. The central part illustrates a Firebase Functions micro-service, which exposes two endpoints. It makes use of a 3rd party OTP library, which is mentioned later. In order to generate access tokens, the micro-service utilizes Firebase Admin SDK. Another crucial component is the Real-Time Database offering. It’s protected with the so-called database security rules by Firebase. On the left-hand side we can see all the client devices, which will be actively communicating with the service.
In order to successfully implement a solution that works with one-time passwords, we need an external library, which can manage the generation and verification of those passwords (tokens). For the purpose of this tutorial, we’ll be dealing with otplib. It’s a Time-based (TOTP) and HMAC-based (HOTP) One-Time Password library. Next, to be able to generate QR codes (which will be scanned by the Google Authenticator application, so that the tokens start appearing on that particular smartphone), we’ll be using the qrcode NPM library. It’s basically a QR code/2d barcode generator.
Initially, we start with creating a brand-new project in Firebase. That’s not a prerequisite, you might want to use an existing project instead, totally up to you. Once you set it up, the next step is to generate a new Service Key from the cloud backend’s console. The key will be later used to initialize the Admin SDK from our Firebase cloud functions.
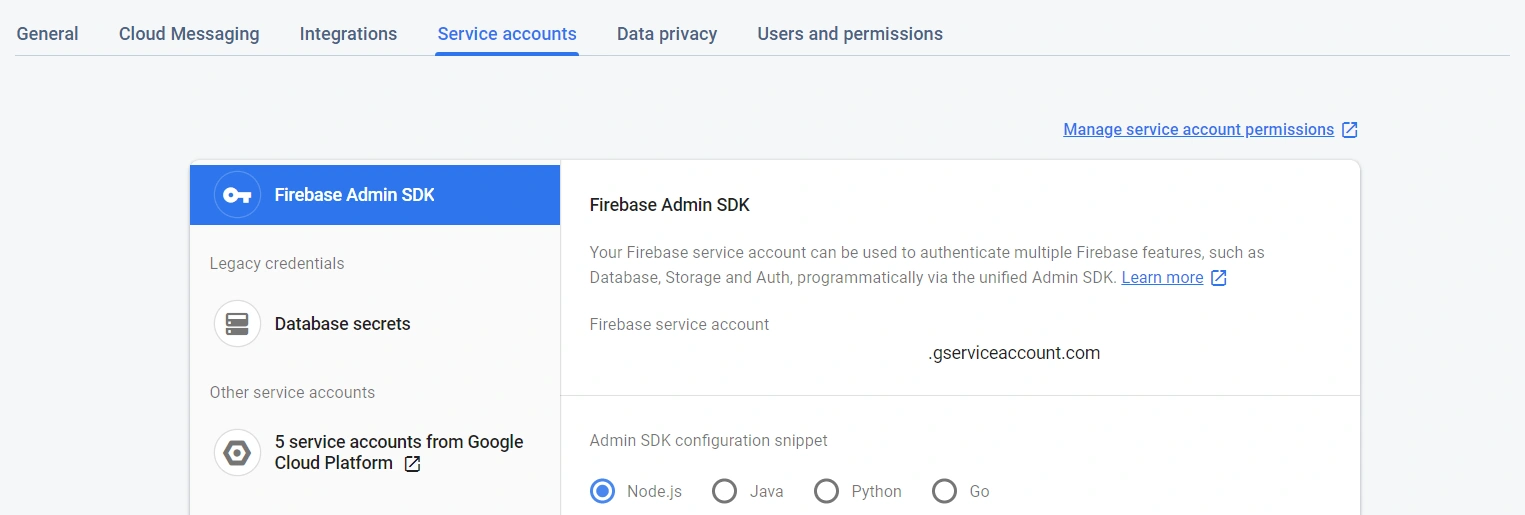
Once the Service Account Key has been generated, let’s start shaping-up the functions. Please use this GitHub repository as a reference. For this article, we will place the Service Account Key inside the source code, even though this is NOT the right place to expose keys. We’ll do it only for demonstration purposes. If you are planning to plug this solution into your production environments, make sure to store sensitive information securely. A way to do so is via using environment variables (not covered in this article).
exports.register = functions.https.onRequest((request, response) =>
    cors(request, response, () => {
        let email = request.body.email;
        let displayName = request.body.displayName;
        let secret = otplib.authenticator.generateSecret();
        admin.auth().createUser({
            email,
            displayName,
            password: crypto.randomBytes(20).toString('hex'),
            disabled: false
        })
            .then(user =>
                admin.database().ref(`/firebase-otp/${user.uid}`).set(secret)
            )
            .then(() =>
                promisify(
                    qrcode.toDataURL
                )(otplib.authenticator.keyuri(email, 'firebase-otp', secret))
            )
            .then(data => response.status(201).json({
                success: true,
                message: `${email} successfully registered!`,
                data
            }))
            .catch(error => response.status(400).json({
                success: false,
                error: error.message
            }));
    }));
The process is quite straight-forward. We expect the User to provide us with an email address and a display name. Having received those, it’s our responsibility to create an OTP secret for them (using the otplib library). As for the next step, using the Admin SDK of Firebase, we manually create the User with a randomly generated password. The password will never actually be used, it’s just to satisfy the createUser function’s definition. Now that we have the new User registered and their OTP secret generated, it’s about time to persist this secret.
Note: Keep in mind the difference between the OTP secret and the User’s password. An OTP secret is used to generate and validate OTP tokens. The User’s password is just a regular password, which is required while creating new users. The fact that our micro-service will be using one-time-passwords for authentication results in the actual (randomly generated) password to be never used.
Once the secret is securely stored, it’s time to return a QR code to the User, so they can scan it, and start receiving tokens via the installed Google Authenticator app on their phones. Please see the two crucial functions playing a role in this:
Please also mind the promisify function’s implementation. It’s purpose is to ensure that the toDataURL() function resolves with a promise, instead of with a callback.
Imagine you have a business case, which says — “The Users of a system should not have permanent passwords. Instead, they should authenticate themselves using short-lived tokens.” For such scenarios, Firebase came up with Phone Number-based authentication.
“You can use Firebase Authentication to sign in a user by sending an SMS message to the user’s phone. The user signs in using a one-time code contained in the SMS message.”
What if we do not want to use phone numbers for such cases? Here comes the solution that we are working on; moreover, it’s flexible and customizable.
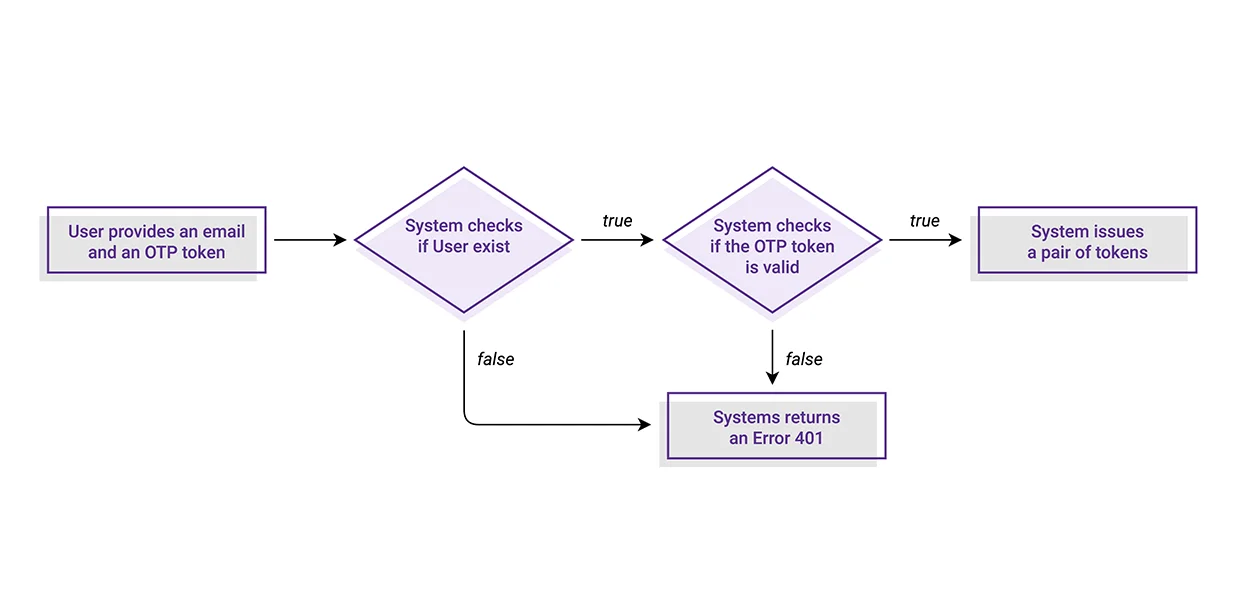
Like every other Identity System, our micro-service also needs to provide a mechanism for authenticating already existing users. This mechanism makes sure to check and verify the existence of such an identity. In case of truth, the System issues a corresponding token, which then can be used to authenticate this User in consequent requests for protected resources.
In our case, the authentication logic is responsible for processing the pair of an email address and an OTP token provided by the User. There are two crucial moments in this flow:
If any of those fail, the function will result in a 401 Unauthorized error. Just like I mentioned above, in case of success, the System will issue a group of Access, ID and Refresh tokens for this User.
exports.authenticate = functions.https.onRequest((request, response) =>
    cors(request, response, () => {
        let email = request.body.email;
        let otp = request.body.otp;
        let uid = null;
        admin.auth().getUserByEmail(email)
            .then(user => {
                uid = user.uid;
                return admin.database().ref(`/firebase-otp/${uid}`).once('value');
            })
            .then(
                secret => secret.val()
            ).then(
                secretValue => otplib.authenticator.check(otp, secretValue)
            ).then(result => {
                if (result) return admin.auth().createCustomToken(uid);
                throw new Error('Unauthorized!');
            }).then(token => response.status(200).json({
                success: true,
                message: `${email} successfully authenticated!`,
                token
            })).catch(error => response.status(401).json({
                success: false,
                error: error.message
            }));
    }));
Having implemented both functions, and having deployed the micro-service, it’s about time to test out the behavior. You can use a REST client to your liking. Initially, start with creating a new User. You need to provide an email address and a display name as body parameters for the request. If registration goes well, you’ll then receive a data URL containing the QR code to be scanned. Once you have completed that, a token entry for this account should appear on your device’s Google Authenticator app. Any consequent requests for registering the same User will fail with the message that this User already exists. That’s possible thanks to the Firebase’s Admin SDK, which takes the responsibility of handling this administration.
Now that you have a registered User, you can experiment with utilizing the OTPs. Each OTP (token) will be valid for a period of 30 seconds. Once it expires from Google Authenticator, it will also be no longer valid for identifying the User.
Please, take your time and feel free to run lots of experiments with this end-to-end solution. We’d appreciate your comments and remarks. Should you need further help with the implementation, or any other tips, please get in touch.
Thanks!